Friday, April 16, 2010

Sprouts

Yay! I have sprouts of indigo!  I am so excited.  Below, you can see I used one of those Jiffy Greenhouses with the peat pellets to start my indigo seed.  I followed the Jiffy instructions and poured the water into the tray and let the pellets expand for about an hour.  I then used scissors to make sure the top of the mesh was open and to stir up a little of the peat on the top of each pellet.  I dropped several seeds (they are tiny) onto each pellet.  I will have to thin them out and I am sure there will be some that don't make it.  I did my planting on Monday, April 12, 2010.


I have to admit to be a bit worried on Tuesday when I saw some fuzziness on top of the pellets, but then I remembered that some plants have fuzzy little roots when they are sprouting.  I decided to take the giant leap of faith and not look at them again until today (Friday) and my reward is seeing these lovely sprouts.


My favorite pic of my new indigo sprout babies is below.


I am going to start another flat with the remaining seed.  I have a few other friends who would like to try out indigo and we are going to see if we can keep a few going indoors year round for fresh leaf dyeing as well as some outdoor planting.  We will find out who has the best outside soil and who has the best indoor conditions and do some sharing.

Thursday, April 08, 2010

Indigo Seed


I am so happy--my indigo seed arrived in the mail today. Polygonum tinctorium also known as Dyer's Knotweed from Companion Plants. I was not exactly sure how much seed would be in each packet so I ordered six packets. I am now the proud owner of 300 indigo seeds. I really only planned a planting bed for 48 plants, not a whole field. My original plan called for about 100 seeds in hopes that I would end up with 48 plants healthy enough to transplant from seedlings to planting bed. I am putting the extra seed packets into the fridge for next year now. If all goes well I will be able to harvest my own seed at the end of the season. My hubby is even on board with this project as he likes to plan our yard space and likes growing things.

I am going to start the seeds this weekend and will keep posting my progress here. I am thinking of taking a plant or two to school to grown indoors there year round and see if I can keep it growing over the course of a year to do fresh leaf vats in the off season.

All of this--the persimmon juice fermenting into kakishibui in my basement, the indigo farming, the ebaying to get bolts of antique silks--just to make one dress. A very special dress for one of my nieces. She is quite the artist herself and sat down with me at one of our family gatherings to give me some input on how it should look. One of my other nieces is going to assist with the beadwork and make the jewelry to accompany the dress. I have never taken so long to plan or make anything before.

Pincushions


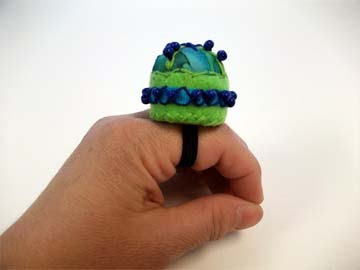
My students are having a hard time keeping track of their needles for their shibori. And then, on my yahoo page, I saw the answer. Pincushions via the Whipup feed. If you use yahoo, you need to add this to your page. You can also visit them at whipup.net Whipup finds some great crafty and artsy links and collects them for us. Thank you whipup! So, back to those pincushions--there they were in the feed just when I needed them. I zipped off an e-mail to all the teachers and by the end of the day I had enough soda bottle plastic lids to make some lovely little pincushions for each child. Add some felt, some stuffing, some bali fabrics, and a little elastic to those bottlecaps and you can end up with a great little pincushion. I must warn you that it can be addictive to make these. Here are some links to different instructions:
http://howaboutorange.blogspot.com/2007/06/tiny-pin-cushion-tutorial.html
http://www.craftstylish.com/item/945/how-to-make-pretty-pincushions
http://www.instructables.com/id/Sew-Useful:-Handy-Dandy-Bottlecap-Pincushion/

We punched holes in the lids to add elastic so we can wear them as a ring or as a bracelet. Keeps them from losing their pincushions. Have I mentioned they lose things?


Here are the examples I made.

Wednesday, April 07, 2010

Indigo Magic

It feels good to be up and running with my art again. I am hoping my excitement over creating rubs off on my kids at school. I decided to do only indigo with them this nine weeks. Some of them were a bit disappointed when I told them we were doing blue and more blue. Until they saw how an indigo vat works--and then it was "Indigo is magic!" They liked the subtle variations in blue it made on their mokume samples.

My students are doing small samples of different techniques and then they will work on a larger finished project. I have them start off with mokume--rows and rows of running stitch gathered tightly to make a woodgrain pattern. We discussed how your stitch and row size would change the pattern as well as how tightly you gather and compress the cloth. I think indigo is a little more forgiving than some of the other dyes in that it will give you those subtle in between shades in areas that are not gathered as tight.

In order to make our vat, I bought a two gallon white plastic bucket with lid at Lowes, a package of RIT Dye Remover, and package of indigo crystals from Paradise Fibers. $11.00 for a 2 ounce package is reasonable when you find out how much dyeing you can do with it. I used a heaping teaspoon of the indigo crystals with the bucket filled 3/4 of the way up with water. 1 tsp of the Rit Dye Remover is added to the water and allowed to dissolve and then the heaping teaspoon of indigo crystals was sprinkled over the top, allowed to dissolve and then gently stirred with wooden dowel rod.

You can see how the water turns a lovely green color as the indigo gets suspended in the reduction vat. It seems a little odd using dye remover to dye with doesn't it? Indigo will not dissolve in water, so it has to be reduced in water with the oxygen sucked out of it by the dye remover. Okay, that is a bit simplified for those of you who are advanced dyers, but I work with middle schoolers all day.

In the pics above and below I am doing a test dip to see if I have the right balance of indigo and dye remover. If you have too much indigo it can "crock" off and you are wasting the indigo. When it crocks off it is not bonding with the fiber and is floating on the surface of the fibers like a coating. If you have too much of the dye remover, it will strip out more color than it bonds on each time you dip and you will waste a lot of time dipping and not getting those deep blues.


The test strip is greenish as it comes out of the vat and starts to turn blue. I have found that different types of indigo and different types of vats will have a different green color and will also produce subtle differences in the blues you get. A natural fermented vat will have a slight purple to the blue--maybe because of the madder root used to help along the fermenting?

If you can see the slickish slimy looking dark blue goo on the test piece above, that is part of the "flower" or bloom that forms on top of the vat. I did not bother to take it off for the test dips. When you do scoop it off the top before dyeing, you reserve it to put back on when you let the vat rest between dye sessions. I usually scoop it onto the vat lid or into a small plastic container.

Below, we have students dipping their mokume samples and removing them after a five minute dip. You have to be careful to not swish too much and add air into the vat as it will oxidize all your indigo. A slow gentle dip in, gentle slow swirls, and slowly lifting out after your decided length of time. Since these are samples only, we only did one five minute dip. For really deep blues I would do several 15 minute dips, allowing it to oxidize in between each time. The really deep deep blues on some Japanese textiles are dipped over 50 times.


After a quick rinse in water, the students used a small fan to help speed up the oxidizing of the samples.
Stitches have to be removed and the pattern is revealed. The students asked great questions about why some people had more white patterns left and why some had more light blue and why some had hardly any pattern.
All of the students lovely samples drying on the rack in the back of my art room--tomorrow we will discuss why they look the way they do and talk about being in control of the pattern and getting it to do what we want when we want. I really don't care when my students make "mistakes" as long as they learn from them. It is great that these samples are not all perfect as we all get to see what happens when you do things differently. To be honest, my students are my own little dye experimentation lab and I learn as much from them as they do from me.

Monday, April 05, 2010

Felting

Here is my machine knit scarf with the wooden balls rubber banded in. I wetted it out, and put it into a fuschia dye bath. It just seemed wrong. I quickly poured off the dye, rinsed the scarf and started over. I thought warm was the way to go, but seeing it floating in the dye bath made me think this scarf was more organic and needed to be an earthy color. What is more earthy than brown?
Brown it is! In the pic below you can see how it felted up nicely around the resists and the greyish brown I dyed it. A side benefit of the process is cool patterns dyed onto the wooden beads used as resists. I have some ideas for another project based on those,
With the resists removed, the scarf has this lovely bumpy "growth" on it. The rubber bands also resist the dye so each bump has a cream colored ring around it.
Up close it is like a landscape of yarn.
The backside is really interesting too.Now I need to decide if it is finished or if I should play with some needle felting to embellish it? I am going to crank out some more scarf blanks on the knitting machine this summer to get ready for the winter season. I really loved how the Fisherman's wool felted up.

Thursday, April 01, 2010

Back to work


Finally I am getting to start on projects again. I still have some swelling and have to rest my hand, but it really feels good to be making things again. I dug out my old knitting machine and after some frustration over getting the tension right, I was able to crank out a scarf.

I used Fisherman's Wool Yarn from LionBrand in natural so I can dye it. I plan to shibori felt it and dye in one step. Just trying to decide what colors. I am in an indigo mood as I have some seed on the way from Companion Plants, but I want to make this more colorful so I think acid dyes in a warm palette are in order for this project.


I am hopeful that we will have a warm sunny weekend so I can set up the dyepot on the back porch. I just need to finish putting the wooden beads into the scarf to act as the resist.

Friday, January 15, 2010

Digitized Shibori

One of my off and on love affairs of late has been Spoonflower. I love it because it is so easy to use, I hate it because--um, well it is so easy to use. I have had fun just cranking out designs and playing with the repeats of them. Honestly some of them are crap. I have also been playing around with Photoshopping some of my shibori samples. It makes me feel unclean to do this to my shibori. Shibori is done by hand, it is a careful zen like process. Here I am playing with it in Photoshop. It almost feels sacrilegious. Spoonflower is like my dirty little addiction.

I have to say some other designers have beautiful work on there that I covet and admire. There is also a lot of crap (my own included, so please, no hate mail.) Recent discussions on Slow Cloth have me thinking more about why I am doing things, what I am learning, and what I am contributing. The good, the bad, and the sometimes ugly. Is it okay to make ugly art if you learn and grow from it? Is it okay to share your ugly work? Or should ugly work be banished and hidden or even destroyed? Should I delete my Spoonflower designs that just did not quite work, or should I keep reworking them?

I took the plunge and ordered more swatches of designs I had previously done on Spoonflower. Time to decide to keep or eliminate. I also need to make a decision about what to make with these designs. I am thinking of upholstering a chair and painting the wood in bright colors?

Tuesday, January 12, 2010

Slow Cloth

Slow Cloth is a group started on Facebook for discussing the idea of Slow Cloth. Started by three wonderful, thoughtful artists--Elaine, Jude and Glennis. Anyone interested in textiles and what they mean in today's world should check out the discussions going on over there. The group is new, is growing, and is very active.

Sunday, January 10, 2010

On with the New Year

So what does 2010 have in store? I have had lots of down time with the hand to start planning and thinking about projects for this year. I have been doing some soul searching and asking myself questions. Do I do projects for recognition or for personal pleasure? Do I try to do lots of small things for instant gratification or do I go for one really great big project? Do I try to teach and share or just selfishly do my own thing? What has been holding me back from getting things done? How do I get myself organized to accomplish my goals once I set them?

One thing I have learned, is that it does help to set goals and to actually write them down. Writing them down is like making a promise to yourself--if it is important enough to write down it must be something important to you--right? A great site for helping to plan and organize is diyplanner.com I love the templates directory and have even contributed a few myself. A simple dayplanner and a simple weekly planner and my DIY Voodoo Kit. The latter is just for fun. DIY Planner has some great contributors and I enjoy reading the articles on getting organized and how people share their creative answers for getting organized. I wish I could make an organizer system for artists, but what works for one would not for another so I just need to finish making the one I started for myself.

So let's see, back to goal setting... I want to test out my ideas for the dress I am going to make for my niece using kakishibui and indigo. I want to make a bib necklace using the awesome retro beads I found on Etsy. I want to get my shibori videos finished. I want to get my plan for my Japan trip in place. I want to get a better list of Japanese sewing term translations organized and posted. I want to sew my way through the rest of my Japanese sewing books. I want to get my Etsy shop going. I want to get my Spoonflower fabrics tweaked for better colors and make something using my own fabric. I want to experiment more with katazome (rice paste resist dyeing.)

Well I feel better putting that down. It did make me think about what was more important to me. Now I have some focus for the year. Two weeks until the pins come out. I better print out a calendar and start some planning on paper!

Saturday, January 02, 2010

Hand Progress


Here is my x-ray from the day my cast came off. Kind of creepy, but not so gross as looking at my actual hand. I now have twenty three days until those pins come out and then will do rehab on my finger for a while to get my grip back. I am doing my flexes every hour like I am supposed to. I have got a little more bend back into the middle knuckle joint. The progress seems so slow right now. Hydrocodine and I do not get along! I am just taking ibuprofen now.

The pins get cold fast and the weather here in Indiana has been COLD. It is a weird feeling in my finger joint where the pins are when they get cold--bone chilling has new meaning for me now.

I am wondering if picking up being left-handed will make me smarter by forcing me to use the right side of my brain more? LOL, probably not. Simple things have been easy to pick up on doing left handed--like eating, typing one handed, and other simple tasks. Harder is fastening hooks and zippers on clothing, writing (I can do it but the angle is all wrong), and opening those dang child proof caps they put on everything. Oh yeah--and scissors! Scissors left handed takes some concentration. I have only a small understanding of what stroke victims go through.

I have to admit that fear creeps in now and again at this point. What if it does not heal correctly? What if it does not have enough grip ever again? What if it does not fuse? What if it hurts all the time? What if I can't do my art or have to relearn how to do my art? I guess I am just a little depressed right now. I know I need to think positive healing thoughts!